Showing posts with label Clothes. Show all posts

Easy DIY Holiday Sparkle Shirts with Tulip Shimmer Sheets


If anything says "Here comes Christmas!" it's GLITTER!
The sparkles, the twinkles, the glittery magic - it's my favorite!!!
Well, Tulip Shimmer Sheets make adding sparkle to your holiday clothes easy peasy!!!!
I recently got a box of shimmering Tulip goodness and I set to making
some gorgeous DIY shimmer shirts for Isabella and my new niece to wear this
Christmas season.
(You can see my entire haul of Tulip products HERE. Be kind - it's my first video.)


SUPPLIES:
Tulip Shimmer Transfer Sheets
Tulip Iron-on Glass Crystals
Tulip Cordless Heat Setting Tool
Plain t-shirt or onesie
Scissors and/or Personal Cutting Machine
Iron
Pressing cloth

Since this was a shirt for Isabella I had her help me pick out
a shirt for the project and she chose the gold Tulip Shimmer Sheet
to glam up her green Christmas t-shirt.
I decided to try out using my personal cutting machine to cut an intricate
snowflake shape for my shirts.

STEP ONE
Place the Shimmer Sheet with the "sticky" adhesive side down on your cutting mat.

STEP TWO
Load your design to be cut into your machine.
I had the best success with my cutting machine when I kept the design
away from the edges of the cut space.

STEP THREE
Load the Shimmer Sheet on the cut mat into your machine.
I did a few test cuts with the blue shimmer sheet I was using for my niece's
onesie to get the best setting.
On my machine I had the best success when I set the machine
to "flocked heat transfer material" and used my pink - deep cut blade.

STEP FOUR
Carefully remove the cut design from the cut mat.
I had my favorite pair of sharp scissors handy to snip any spots
that didn't cut all the way through. In cutting 4 snowflakes, I only had
one spot where I needed them.

STEP FIVE
Arrange your Shimmer Sheet pieces on your shirt in the desired pattern and
heat up your DRY iron to the setting appropriate for the fabric of your t-shirt.
As you can see my shirt is magically black because a certain 3.5 year old
decided she wanted a black shirt instead of a green one.


STEP SIX
Place a pressing cloth over the Shimmer Sheet pieces - being careful not to disturb your design.
Iron your design into place by pressing firmly for 40 seconds.
Check to make sure the pieces are set. Re-iron is necessary.

WOOHOO!
Now you have shimmering t-shirt awesomeness!

If you want to kick up the glam a few notches . . .
AND WHO DOESN'T???
. . . then read on.
Grab your Tulip Iron-on Glass Crystals and Cordless Heat Setting Tool.

STEP SEVEN
Arrange your iron-on glass crystals in the desired pattern.
Hold the button on your Heat Setting Tool for 5-10 seconds to heat the tip.
Be careful to only touch the plastic portion of the Heat Setting Tool.
Gently touch the tip to the top of the crystal - do not press too hard or the
heat setting tool will touch your t-shirt and scorch it just like an iron.
Hold for 5-10 seconds and allow crystal to cool and check that it is set.


Now you have a holiday shirt that is sufficiently shimmered!


Isabella insisted on putting her shirt on immediately,
which was perfect because I needed a model to take pictures
of my fantastic sparkly shirt.


To see other great holiday projects using Tulip Shimmer Sheets
be sure to check out these great sites!


You can find more Tulip products & projects on their website,
and find them on Facebook, Twitter and Pinterest.

Disclosure: I wrote this post as part of a paid campaign with Tulip and Blueprint Social. The opinions in this post are my own.

Shopping for Winter Clothes at #CookiesKids


This Christmas we're headed to Utah to visit the Grandparents.
I'm really excited to go, but when I was pulling out the winter clothes
for the change of seasons, I realized that Isabella's winter coat isn't going to fit her this year.
I decided to check out the winter clothing options at Cookie's Kids.

I was pleasantly surprised to find this great online signage as soon as I arrived at Cookie's Kids.
Woohoo! Winter Fashion!!!!
This was the first I have ever shopped at Cookie's Kids online store and I was so 
excited to see all the great name brands they have at such great prices.

One of the things that can be daunting about online shopping is getting the right size.
Each brand fits differently and with Isabella's long torso, I'm always worried that 
clothes will be long enough in the torso, but not too long in the arms, etc.
Cookie's Kids has this great little helper called Alva Kids.
You enter in your child's height, weight, and birthday and it helps you choose
the right size for that particular item of clothing.
Genius!

I enjoyed shopping online at Cookie's Kids.
The categories are well organized and easy to navigate and I appreciated
the option to "view all" in each category rather than having to scroll through page
after page of items and then trying to get back to the item I liked the best.
You can read more about my shopping experience in my Google+ story.


My items came is a quick and timely manner in very lively packaging.


The first item I chose to add to Isabella's winter wardrobe was this great
pink London Fog Insulated Jacket with scarf.
I was so pleased with the fit and sizing of the jacket.

Isabella loved it and even though it was 75 degrees outside when the coat arrived, 
she wanted to wear the coat to pick up her brother from school.

The second item I added to her winter clothing options was a pair of long johns!
And because Isabella is crazy for pink, I had to nab these Dickies Thermal Long Underwear.
They are perfect for wearing under snow clothes as an extra insulation layer
or to keep you warm on cold winter nights.

I was most excited to see that the jammies were tagless!!!
This is a definite must for my little eczema prone little girl.
I think that all kids clothing should be tagless - it would save so much heart ache!

That night after a warm bath she insisted on wearing them to bed.

I was definitely pleased with my shopping experience at Cookie's Kids.
They had great options for kid's clothing, great name brands, and great deals.
I will definitely be shopping there again soon.

Cookie's Kids has seven stores in the NYC area in the Bronx, Brooklyn, and Jamaica.
You can also shop online at CookiesKids.com
And if you're looking to add to your child's winter wardrobe, school uniforms,
or just like to shop for kids fashion, I've got a COUPON CODE for you!!!

Use the code:
funkypolkadotgiraffe
for 10% off sitewide.
(Expires 12/21/12)

You can keep up with Cookie's Kids on Facebook and Twitter.

 
I am a member of the Collective Bias™ Social Fabric® Community.  This shop has been compensated as part of a social shopper insights study for Collective Bias™ and CookiesKids.com #CBias #SocialFabric.  
All opinions are my own. 

Funky Flashback: Fourth of July Ruffled Flag T-shirt


Here's a little flashback to a fun shirt to make for the Fourth of July.
It's quick to make and put together.

You'll need;
plain white t-shirt
blue/star fabric
striped red and white fabric

FIRST
Cut strips that are 1.5" wide and the length of the fabric from selvage to selvage.
Most likely, you'll need 1 strip of blue fabric and 2-3 strips of red/white fabric.
Ruffle the strips by running a long/tight stitch down the middle of the strip.


 SECOND
 Cut and arrange the strips onto the t-shirt and pin into place.
Sew down the middle of strips - directly on top of the gathering stitch.

And VOILA! you have a fabulously ruffled flag shirt.


Enjoy your Fourth!!!


Spring Pocket Dress Tutorial

We had a fabulous Easter up in Oregon visiting my in-laws.
The weather, which was supposed to rain the entire vacation,
totally cooperated and we had 4 out of 7 sunny days for fun 
in the Big Woods where Grandma and Grandpa live. 

I got Isabella's dress all cut out and planned before we left,
but never got around to making it.
I had the grand idea that I would take it and my new sewing
machine with me and then I'd have one day to
sew it before Easter Sunday AND I'd have my fabulous
mother-in-law to help me and keep me on the right track.

She did keep me on track and she helped me finish the dress
and JT's bowtie in the nick of time - like 10:30 the night before Easter :)
Which is WAY better than 8:00am Easter morning - before a 9:00 Service,
which is what it would have been if I tried to do it all on my own.

I {LOVE} how it turned out!!!!
And JT looked pretty sharp in his matching bow tie.
However, he informed me that he prefers regular ties.

This is really more of a how-to of how I made the dress, than a tutorial, 
but I'll talk you through it and you can let me know if you have any questions.

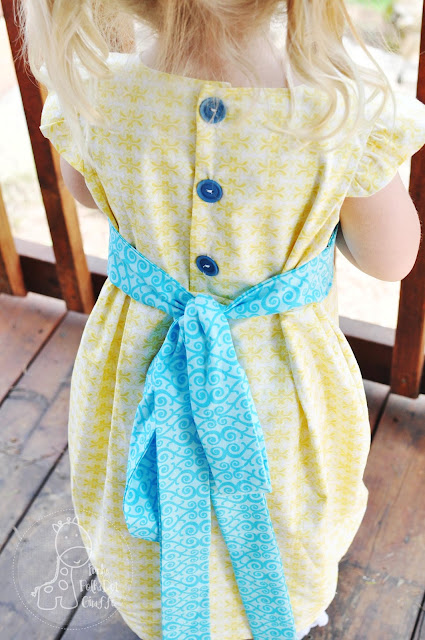
THIS TUTORIAL over at Shwin&Shwin was the inspiration for my dress.
I liked the idea of pockets and a bubble shaped skirt.
However, I didn't want a sleeveless dress and I wanted it to have a
tie in the back, instead of the pleated belt on the front.

S&S used one of their own patterns for the bodice of the dress.
I didn't want to purchase a pattern, so I dug through my patterns
and found a dress with a similar neck line.
However, it was a pattern for a full dress, so I improvised
and used an altered version of the pattern I already had.

I also wanted it to have a sleeve, so I added a cute little flutter sleeve
because it's an easy peasy sleeve to add - and we're all about easy peasy.
It's basically an oval shape which you fold wrong sides together,
baste, gather and then pin into place.
To add the sleeve, I just pinned it in between the dress and lining
and then sewed the bodice together following the directions at S&S.
I lined the top of the dress with the same fabric as the outside,
that way it if it showed a little bit in any spot, it wouldn't be that noticeable.


My new machine does buttonholes!
I am so freaking excited about it.
However, when my mother-in-law offered to
do them for me while I worked on the bow tie,
I couldn't pass that up!
So I didn't do my own buttonholes this time . . . next time . . . 
I opted for three buttons instead of four like S&S,
because I have a thing about threes :)


For the belt/bow I made it in three pieces - 
one piece which fit exactly across the front from one side seam to the other 
and the two long piece which became the ties.
We tacked the front piece at the side seams and along the bottom of the dress.

The back ties ended up being longer than we wanted,
but there was no time to shorten them before church,
so one day I'll get around to make them a few inches shorter.

Isabella's favorite feature is the pockets :)

A little tip for doing the box pleats,
find the middle of the front of the bodice and mark with a pin,
then find the middle of the skirt and pin to the middle mark of the bodice.
Then, find the middle of each of the "halves" of the bodice and mark with pins,
and again find the middle of the "halves" of the skirt and pin to the middle marks of the 
"halves" of the bodice portion of the dress.
Then fold your pleats into each side of the pin for the "half" and pin.
S&S has a great image of a box pleat, but no directions on where to place them.

I hope that helps if you're interested in making a similar dress.
If you have any questions, please don't hesitate to ask.

And of course she needed some cute matching bows,
and pinwheels scream spring to me.


And not to be left out - my favorite little dude!
I used THIS PATTERN by Jocole for his bow tie.
I think the sizing is perfect of JT right now,
I love how stiff it is and I love the elastic option.

So there you have it,
my walk through of how I create Isabella's Spring Pocket Dress.
A special thanks to Shwin&Shwin for the inspiration
and to my mother-in-law for all her help!


Dr. Seuss Birthday Celebration


We take Dr. Seuss pretty seriously around here -
as evidenced by the picture above :)
JT's kinder class had a celebration on Friday,
complete with guest readers and pj's.


So I decided the day before that the kiddos needed some
rad and festive jammies to make the celebration
just that much more awesome.

JT got PJ bottoms and I appliqued a tie
onto a plain white shirt for him.
I added 1" pleats to the bottom of Isabella's pants.


She also got matching hair bows . . .


and a removable bow tie for her shirt.


And of course I made them wear them all day :)


That night we had a Cat in the Hat pizza,


Red Fish Jell-O,
the Yink's Pink Ink Drink,
Green Eggs, and Cat in the Hat Kabobs.


I hope your day was Seuss-tastic!