Showing posts with label Product Review. Show all posts

Product Review: I See Me! Personalized Coloring Books

I had the opportunity to check out the I See Me! personalized coloring books
and placemats. I have to say that they are so cool!!!
The "My Very Own Name" coloring book has animals bring
your child's name letter-by-letter in a darling rhyme.


This activity book was perfect for my JT because he LOVES animals! 
So I know that when he receives this for Christmas he is going to love
how the animals are coming especially to celebrate him.

He will also love that he can color the pictures - he loves to color!

I love the rhyming for my emerging reader because he can start
reading it independently and enjoying the story about his name
whenever he'd like to.

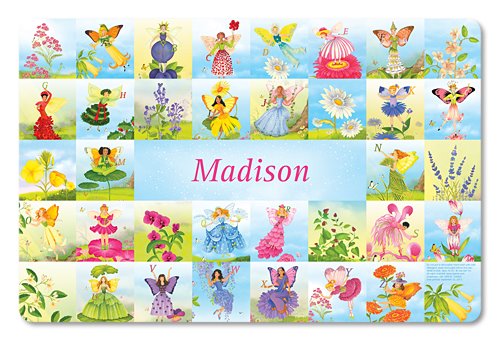
For Isabella I got the "My Very Own Fairy Tale" coloring book.
She is currently fairy tale obsessed - princesses, fairies, magic - she loves it!
This book has the same premise, but instead of animals, fairies
bring each letter of your child's name.


The books are fun, include great pages for coloring, and also have fun
learning activity pages at the end of the coloring book for your child
to complete and practice with her name.
I know that both of my kids will love finding them under the tree on Christmas Day.


I See Me! also makes beautiful personalized placemats.
They also have the fairy and animal themes, as well as many other
themes that are desirable to children.
I chose the My Very Own Name placemat for JT because of the animals.

For Isabella, I chose the My Very Own Fairy Tale placemat.
I especially liked that the alphabet is on the placemat, along with her name.

I was impressed with all aspects of the I See Me! personalized products.
They coloring books are well made and will make excellent gifts for my children.
Right now I See Me! has a really adorable personalized  
Darling!!!

Along with the coloring books and placemats, I See Me! also has personalized
I think any of the options would make fabulous gifts for that special child in your life.
One of the nice things about I See Me! is that the more coloring books
and placemats you buy at one time - the more you save!
There are coupon codes on the front page of each of those items - depending
on how many you plan on purchasing.

Disclosure: I received product for review purposes. All thoughts and opinions are my own.

Lean Cuisine Asian Flavor and Gyozas (Recipe!)


December is a busy month for us and my husband works long days,
so a lot of the time when dinner comes around it's just myself and the kids.
On especially busy nights - like Wednesdays - when we are running from one
activity to the next and it would be so easy to go through the drive-thru for dinner,
I'm always looking for quick & healthy meal options - enter Lean Cuisine!
The kids are happy with dino nuggets and fruit and veggies,
but let's just say we don't have the same taste and I want something more.


The other day I was shopping at Sam's Club and checked out the frozen foods section
to see if I could find the Lean Cuisine Asian Flavor 6-Pack.
The 6-pack was conveniently located in the frozen meals and I was super excited
to find this single-person serving meal that I could enjoy while the kids
enjoyed their meal.
(You can read about my shopping experience in my Google+ Story.)

This week Thursday was busy, but not as busy as Wednesday, so I had a little
extra time to prepare a yummy side dish to pair with my Lean Cuisine Sesame Chicken.
I chose to whip up gyozas - a family recipe from my sister-in-law.
They are a Japanese fried dumpling and super yummy!


You'll need:
1 lb. ground beef
1 c. cabbage
1 small onion
2 T. soy sauce
salt, pepper, garlic to taste
wonton papers
oil for frying

Brown your ground beef and drain.
Add cabbage and onion and cook until cabbage begins to turn translucent.
I was feeling adventurous Thursday so I used broccoli and shredded carrot instead.
Season with salt, pepper and garlic.
Add soy sauce.

Spoon into wontons and roll up.
To roll: fold the top corner over to the bottom corner - but just far enough to cover the filling.
Fold in the side corners one at a time and then fold the bottom corner up over
then all.

Your little gyoza will look like this!

Fry up by heating up some canola oil and frying each side for 5-10 seconds.
Watch them closely - they fry quickly.

While they cooled - because they are HOT! -  I popped my Lean Cuisine in the
microwave for 4 minutes and tidied up the kitchen while I waited.

While my Lean Cuisine cooled, I plated and served the kids.
They were excited for one of their favorite meals :)

My Sesame Chicken looked delicious and I was excited to try it with my gyoza
for a completely delicious meal!

I got fancy and put it all on a paper plate and was ready to enjoy!
I was grateful for a quick and easy meal that I would like, on an evening
when I did have time to prepare a big meal for the family.

If you're interested in making gyozas, I've got a cute little recipe card you can
print and use. Just right click and save!


I am a member of the Collective Bias®  Social Fabric® Community.  This shop has been compensated as part of a social shopper insights study for Collective Bias™ and Nestle Lean Cuisine #CBias #SocialFabric. All opinions are my own.

Easy DIY Holiday Sparkle Shirts with Tulip Shimmer Sheets


If anything says "Here comes Christmas!" it's GLITTER!
The sparkles, the twinkles, the glittery magic - it's my favorite!!!
Well, Tulip Shimmer Sheets make adding sparkle to your holiday clothes easy peasy!!!!
I recently got a box of shimmering Tulip goodness and I set to making
some gorgeous DIY shimmer shirts for Isabella and my new niece to wear this
Christmas season.
(You can see my entire haul of Tulip products HERE. Be kind - it's my first video.)


SUPPLIES:
Tulip Shimmer Transfer Sheets
Tulip Iron-on Glass Crystals
Tulip Cordless Heat Setting Tool
Plain t-shirt or onesie
Scissors and/or Personal Cutting Machine
Iron
Pressing cloth

Since this was a shirt for Isabella I had her help me pick out
a shirt for the project and she chose the gold Tulip Shimmer Sheet
to glam up her green Christmas t-shirt.
I decided to try out using my personal cutting machine to cut an intricate
snowflake shape for my shirts.

STEP ONE
Place the Shimmer Sheet with the "sticky" adhesive side down on your cutting mat.

STEP TWO
Load your design to be cut into your machine.
I had the best success with my cutting machine when I kept the design
away from the edges of the cut space.

STEP THREE
Load the Shimmer Sheet on the cut mat into your machine.
I did a few test cuts with the blue shimmer sheet I was using for my niece's
onesie to get the best setting.
On my machine I had the best success when I set the machine
to "flocked heat transfer material" and used my pink - deep cut blade.

STEP FOUR
Carefully remove the cut design from the cut mat.
I had my favorite pair of sharp scissors handy to snip any spots
that didn't cut all the way through. In cutting 4 snowflakes, I only had
one spot where I needed them.

STEP FIVE
Arrange your Shimmer Sheet pieces on your shirt in the desired pattern and
heat up your DRY iron to the setting appropriate for the fabric of your t-shirt.
As you can see my shirt is magically black because a certain 3.5 year old
decided she wanted a black shirt instead of a green one.


STEP SIX
Place a pressing cloth over the Shimmer Sheet pieces - being careful not to disturb your design.
Iron your design into place by pressing firmly for 40 seconds.
Check to make sure the pieces are set. Re-iron is necessary.

WOOHOO!
Now you have shimmering t-shirt awesomeness!

If you want to kick up the glam a few notches . . .
AND WHO DOESN'T???
. . . then read on.
Grab your Tulip Iron-on Glass Crystals and Cordless Heat Setting Tool.

STEP SEVEN
Arrange your iron-on glass crystals in the desired pattern.
Hold the button on your Heat Setting Tool for 5-10 seconds to heat the tip.
Be careful to only touch the plastic portion of the Heat Setting Tool.
Gently touch the tip to the top of the crystal - do not press too hard or the
heat setting tool will touch your t-shirt and scorch it just like an iron.
Hold for 5-10 seconds and allow crystal to cool and check that it is set.


Now you have a holiday shirt that is sufficiently shimmered!


Isabella insisted on putting her shirt on immediately,
which was perfect because I needed a model to take pictures
of my fantastic sparkly shirt.


To see other great holiday projects using Tulip Shimmer Sheets
be sure to check out these great sites!


You can find more Tulip products & projects on their website,
and find them on Facebook, Twitter and Pinterest.

Disclosure: I wrote this post as part of a paid campaign with Tulip and Blueprint Social. The opinions in this post are my own.

Holiday Stocking Stuffer Ideas: Colgate Holiday Packs


I can't believe that Thanksgiving is over and we're in the countdown for Christmas!
One of my favorite parts of Christmas gifts are the stockings that Santa leaves.
I love choosing fun things to fill the stockings with - and all of the items have to be wrapped!
I usually hunt year round for the perfect stocking stufffers, but this year I've been a little lax in my search.
One thing I always like to include in the stockings are new toothbrushes and toothpastes. 
Good oral hygiene is an important skill for kids to learn,
so I want them to feel like brushing their teeth is a fun and important part of each day.


 I am in luck this year, because while shopping at Walmart, I found these awesome
Colgate Holiday Packs for kids featuring Dora the Explorer and SpongeBob.
I know these favorite characters are sure to bring holiday smiles to my kids' faces!
I love that the toothbrush has the oscillating head and the kids will love
seeing their favorite characters while brushing each morning and night.

Colgate Holiday Packs make the perfect stocking stuffer and are sure
to bring smiles to your little one's face on Christmas morning.
So, next time you're at Walmart, check them out and give the gift of 
oral care to those that you love in a fun and inviting package!
My stockings are shaping up quite nicely - now I just need to find the actual stockings in that endless vortex that is the garage . . . But I still have time!

You can keep up with Colgate on Twitter and Facebook!


I am a member of the Collective Bias™ Social Fabric® Community.  This shop has been compensated as part of a social shopper insights study for Collective Bias™ and Colgate. #CBias #HolidaySmiles #SocialFabric”. All opinions are my own.