Have you seen Brave?
If not, you must!
If not, you must!
Well, as soon as I saw it, I knew that Isabella
had to be this new spitfire of a Disney princess for Halloween this year.
And since I am me and me is crazy . . . .

I totally had to make the wig!!!!!!!!!!!!

When I set out to make this wig,
I was inspired by a lot of the Rapunzel wigs from last Halloween.
I knew it had to be yarn and I knew it had to be curly.


But how to go about it was the question.
I wanted a really authentic wig that would stay on and look unruly and wild
just like Merida's hair in the movie.
So I started researching wig making and came upon a method for making
a wig for a doll where you crochet a wig cap and then thread each
strand of hair through the holes in the wig cap.


Lofty?
Yes.
Insane?
Yes.
Fabulous?
Of course!

Yes.
Insane?
Yes.
Fabulous?
Of course!

Are you crazy like me?
I warn you, this method isn't for the faint of heart.
However, I am in love with the end results,
and working with the yarn is strangely therapeutic.

What you'll need:
2 skeins of Red Heart With Love Yarn in Mango
(I think it's $4.99 at Joann, so with a 40% coupon you can't beat the deal)
F and G Crochet Hooks

First, crochet your wig cap using a basic crochet pattern.
THIS ONE or THIS ONE would work well.
I used my G hook to crochet the hat.
After you're done with the wig cap the real fun begins.
Have your little model stand up and figure out how long you want
each strand of hair to be.
Cut lots and lots of strands :)
I cut mine in groups of 20 so that I didn't have a hot mess of
yarn strands all over my house.
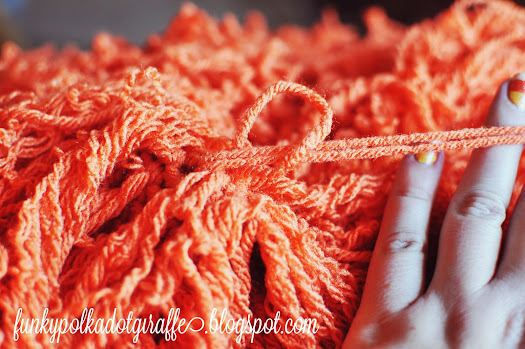
Take a strand and fold it in half.
Poke your crochet hook (I used an F hook) through one of the holes
and grab the loop of the yarn hair strand.

Pull through slightly and then feed the end of the yarn
through itself and pull until the yarn strand "knots" itself to the wig cap.

Here's where things get really wild!
Once it's secure, take a sharp point (I used a pen tip) and poke in
between the four strands of the yarn strand at the base of piece - near the cap.
Run it up the strand to the open end.

VOILA!!!!!
A magically, amazing piece piece of curly yarn hair.

Repeat over and over and over!
For the first 3-4 rows you'll want to work in a circular pattern,
going around the entire wig.
Again, I worked in sets of 20.
Cut 20.
Thread 20.
Curl 20.
Cut 20.
Thread 20.
Curl 20.
You get the idea.
Work up the wig in a hair pattern so you'll get shape of a head of hair.
I would place the wig on your model's head after the first 3-5 rows are done
and come up with a strategy for filling the wig in.
I went around and around and around - skipping 2 rows, instead of 1, from the middle to the top.
If I do it again (HA!) I would start working a pattern about from about
the middle to the top so that the sides meet at a side part.
However, there is really so much yarn, that I'm not sure it would make much difference.
2 skeins of Red Heart With Love Yarn in Mango
(I think it's $4.99 at Joann, so with a 40% coupon you can't beat the deal)
F and G Crochet Hooks

First, crochet your wig cap using a basic crochet pattern.
THIS ONE or THIS ONE would work well.
I used my G hook to crochet the hat.
After you're done with the wig cap the real fun begins.
Have your little model stand up and figure out how long you want
each strand of hair to be.
Cut lots and lots of strands :)
I cut mine in groups of 20 so that I didn't have a hot mess of
yarn strands all over my house.
Take a strand and fold it in half.
Poke your crochet hook (I used an F hook) through one of the holes
and grab the loop of the yarn hair strand.

Pull through slightly and then feed the end of the yarn
through itself and pull until the yarn strand "knots" itself to the wig cap.


Here's where things get really wild!
Once it's secure, take a sharp point (I used a pen tip) and poke in
between the four strands of the yarn strand at the base of piece - near the cap.
Run it up the strand to the open end.

VOILA!!!!!
A magically, amazing piece piece of curly yarn hair.

Repeat over and over and over!
For the first 3-4 rows you'll want to work in a circular pattern,
going around the entire wig.
Again, I worked in sets of 20.
Cut 20.
Thread 20.
Curl 20.
Cut 20.
Thread 20.
Curl 20.
You get the idea.
Work up the wig in a hair pattern so you'll get shape of a head of hair.
I would place the wig on your model's head after the first 3-5 rows are done
and come up with a strategy for filling the wig in.
I went around and around and around - skipping 2 rows, instead of 1, from the middle to the top.
If I do it again (HA!) I would start working a pattern about from about
the middle to the top so that the sides meet at a side part.
However, there is really so much yarn, that I'm not sure it would make much difference.

Next up, THE DRESS!!!
Stay tuned!


