Showing posts with label Costumes. Show all posts

2012 Virtual Halloween Costume Linky Par-Tay!


Since I can't be there for all of your trunk or treats or Halloween parties,
I thought it would be SO fun to have a virtual costume party.

So come and link up your costumes -
handmade or store bought.
I know we all want to show off how darling our kids looked
and get some credit for the work we put into it.
Because we all know,
even getting them into the costumes and look at the camera is HARD WORK!

Plus, it will make us all post
our Halloween pictures in a timely manner ;)

So I'll get this party started.
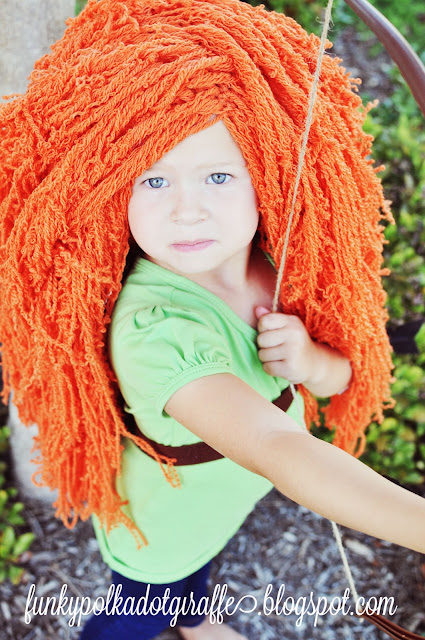
Here's my Frankenstein and Merida.


Frank takes himself very seriously.

Hide yo' children! He's coming!


My rad friend Heidi painted his face all legit.

Merida is serious about her archery skills.


I'm serious about her darling little face.

Costume details:

Frankenstein
Head/Hands - Pottery Barn Teen
Jacket and Pants - Thrifted
Boot Covers - ME!

Merida
Dress - McCall 5499 with alterations by ME!
Wig - ME!
Bow/Arrows/Quiver - Target with alterations by ME!


So come link up and show us what you got!


Mickey's Halloween Party: Hallween Time at Disneyland


I still remember the first year that Disneyland decorated for Halloween - absolute magic.
I was smitten and since that first Halloween Time experience six years ago,
when my oldest was just a wee babe, I've wanted to take my kids
dressed up in their Halloween costumes to Mickey's Halloween Party.


This year, with a little Disney magic, that dream came true!

We arrived at the park at 2:30 - giving us enough time to ride the tram
from the parking structure and arrive at the gates in time to line up with
all the fun people that were there for the trick-or-treating party.

With a Mickey's Halloween Party ticket,
you're granted admission to the park up to 3 hours prior to the start of the event.
The kids were super excited for some extra Disneyland park time.


I didn't mess around and our first stop was The Haunted Mansion!
It is my favorite ride at Disneyland during the holiday season
because it gets a Nightmare Before Christmas makeover.

I was excited to see that Sparky's grave was added to the decor this year.

I wanted to grab some pictures of the kids in their costumes before it
got too crazy with the candy hunting and I forgot.

Isabella takes her archery pretty seriously,
especially when she's shootin' for her own hand!


JT said, "Mom! Can you take my picture too?!"

Group shot!


Isabella had three purposes in coming to Disneyland -
ride Small World, meet Merida and collect LOTS OF CANDY!
And Disneyland's magic was able to fulfill them all.


We checked of It's a Small World first.
Watching her face while she rode It's a Small World was priceless.


Then, as we were leaving It's a Small World I noticed a photo op spot
to meet Merida! The kids were pretty stoked.

Waiting patiently . . . .

GO TIME!
Merida said, "Oh my gosh! You look just like me!"
Isabella was pretty pleased with herself.


At 6:00 it was time for trick-or-treating to begin!
This is when cast members start directing the non-party goers
to main street and all of us with rad neon pink wristbands
get to start collecting the candy!
Can you sense the excitement?


There are trick-or-treat stations throughout the park
and friendly cast members to help feed your sweet tooth.
The treats did not disappoint!
I loved the Frankenweenie/Wreck It Ralph treat bags
and the candy was The Good Stuff - you know what I'm talking about -
 plus healthy snack options like Craisins, carrots, and apple slices.


The Halloween Time decorations through the park are fantastic.
I'd love to have the Disneyland people come spruce up my
home for the Halloween season :)
And what better way to top off a night of Halloween fun at Disneyland,
than the infamous Halloween Screams Fireworks Spectacular over the skies
of the villain-fied castle.


The only way to see this fabulous display of villainous pyrotechnics is
to be a Mickey's Halloween Party guest.

Mickey's Halloween Party will be at Disneyland Park select days through October 31st.
If you want to experience all the magic that the party has to offer,
you can still purchase tickets HERE!
But hurry, they are known to sell out.

The giant Mickey Jack'o'Lantern is waiting for you!


Disclosure: I won tickets to Mickey's Halloween Party through a giveaway and through some Disney magic. I am sharing my experience with you because my family had a magical time and I want
to share my experience with you. All the thoughts & opinions are mine.

Wiggin' Out: Princess {Merida} Costume Wig Tutorial

 Have you seen Brave?
If not, you must!
Well, as soon as I saw it, I knew that Isabella
had to be this new spitfire of a Disney princess for Halloween this year.
And since I am me and me is crazy . . . .


I totally had to make the wig!!!!!!!!!!!!

When I set out to make this wig,
I was inspired by a lot of the Rapunzel wigs from last Halloween.
I knew it had to be yarn and I knew it had to be curly.

But how to go about it was the question.
I wanted a really authentic wig that would stay on and look unruly and wild
just like Merida's hair in the movie.
So I started researching wig making and came upon a method for making
a wig for a doll where you crochet a wig cap and then thread each
strand of hair through the holes in the wig cap.

Lofty?
Yes.
Insane?
Yes.
Fabulous?
Of course!

Are you crazy like me?
I warn you, this method isn't for the faint of heart.
However, I am in love with the end results,
and working with the yarn is strangely therapeutic.

What you'll need:
2 skeins of Red Heart With Love Yarn in Mango
(I think it's $4.99 at Joann, so with a 40% coupon you can't beat the deal)
F and G Crochet Hooks


First, crochet your wig cap using a basic crochet pattern.
THIS ONE or THIS ONE would work well.
I used my G hook to crochet the hat.
After you're done with the wig cap the real fun begins.

Have your little model stand up and figure out how long you want
each strand of hair to be.
Cut lots and lots of strands :)

I cut mine in groups of 20 so that I didn't have a hot mess of
yarn strands all over my house.

Take a strand and fold it in half.

Poke your crochet hook (I used an F hook) through one of the holes
and grab the loop of the yarn hair strand.


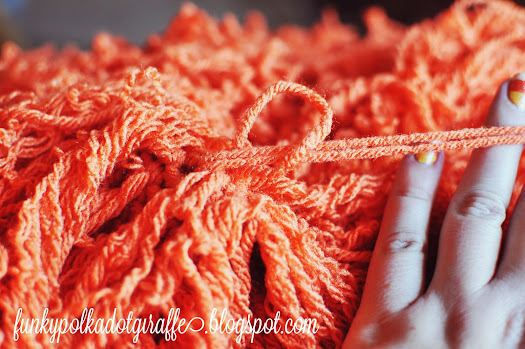
Pull through slightly and then feed the end of the yarn
through itself and pull until the yarn strand "knots" itself to the wig cap.


Here's where things get really wild!
Once it's secure, take a sharp point (I used a pen tip) and poke in
between the four strands of the yarn strand at the base of piece - near the cap.
Run it up the strand to the open end.


VOILA!!!!!
A magically, amazing piece piece of curly yarn hair.


Repeat over and over and over!

For the first 3-4 rows you'll want to work in a circular pattern,
going around the entire wig.
Again, I worked in sets of 20.
Cut 20.
Thread 20.
Curl 20.
Cut 20.
Thread 20.
Curl 20.
 You get the idea.

Work up the wig in a hair pattern so you'll get shape of a head of hair.
I would place the wig on your model's head after the first 3-5 rows are done
and come up with a strategy for filling the wig in.
I went around and around and around - skipping 2 rows, instead of 1, from the middle to the top.
If I do it again (HA!) I would start working a pattern about from about
the middle to the top so that the sides meet at a side part.
However, there is really so much yarn, that I'm not sure it would make much difference.


Next up, THE DRESS!!!
Stay tuned!


Halloween Costume Par-Tay!

Woohoo!
It's Halloween!
Are you ready??
Well, since I can't be there for all of your trunk or treats
or Halloween parties,
I thought it would be SO fun to have a virtual party.

So come and link up your costumes -
handmade or store bought.
I know we all want to show off how darling
our kids looked and get some
credit for the work we put into it.
Cuz we all know, even getting them
into the costume and look at the camera is HARD WORK!

Plus, it will make us all post
our Halloween pictures in a timely manner ;)

So I'll get this party started.
Here's my Big Bad Wolf and Little Red.


(He's trying to be Big & Bad)

Oh, and we can't forget Granny.


For the Treats in the Streets he let me paint his nose.
For the church trunk or treat he was over it.
LOL


He was also over smiling :)


Costume details:
Big Bad Wolf Ensemble - Pottery Barn Teen
Hoodie - Walmart

Little Red Riding Hood
Cape Pattern - Fleece Fun
Corset - Email me and I'll help you out :)
Skirt & Tutu - Me!
Socks - RADtastic jam/sock lady at Penelope Lane Boutique

Granny
Glasses - Target Dollar Spot
House coat - Walmart $5 clearance!!!
Night cap - Inspired by Wag Doll