Hi guys! I mentioned last week that we will be alternating our weekly Thursday classes between Art Journaling and other Mixed Media crafts. We'd love to do the Art Journaling every single week but we just have so so many other fun projects and at this point in time Thursday is our only free day. Hopefully, even you die hard Art Journalers will be just as psyched to tackle these other mixed media projects.You'll find that the supplies and tools used are nearly identical. This first one...our Faux Mini Doughnuts!...is a project that we've had on the back burner forever. They are super easy and super fun...and we've given the finished doughnuts as holiday gifts more than a few times.
We chose to do mini doughnuts simply because they are so adorbs...but you can make standard size just as well. We are big fans of faux sweets. Our home is full of faux cakes and cupcakes arranged on cake stands and under glass domes...we've been collecting them for years. At art events we often try to teach at least one class that focuses on faux sweets but we've never been able to do these particular doughnuts from start to finish at an event...this is due to the sculpting step, which takes 2-3 days to dry. But other than that, they're easy squeezy. This tutorial is for anyone who has the desire to make a sweet piece of almost-good-enough-to-eat artwork! Not even a smidge of crafting experience is required. Just bring your enthusiasm and your sweet tooth!
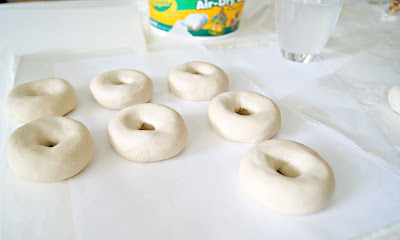
We've used a few different types of clay for this sort of project, but found that Air-Dry Clay by Crayola works perfect for these mini doughnuts!
For this step you will need:
Air Dry Clay
a glass of water
waxed paper
Working upon a surface of waxed paper we rolled uniform sized balls (a little bigger than golf balls...see above pic) after warming the clay up a bit in our hands.
Then we rolled each ball out into individual logs. (see above pic)
Next, join the ends of the logs, pinching and working together to form a ring.
Start smoothing your ring using your finger tips dipped in water.
Perfect your doughnut shape smoothing as you go with water.
Make as many as you'd like! Set them aside to dry for 2-3 days. Yes, we know, the 2-3 days feels like an eternity...but it'll be worth it.
After 3 days or so your doughnuts will be dry and a chalky white. That's really when you'll know that they're dry...the color changes from a creamy white to a white white.
Time to paint them! Pour out your "cake colors". We used chocolate brown, terra cotta, very pale butter yellow, and golden yellow. (and you'll see that we poured a tan khaki type color, but truth be told...we did not use it...so don't bother with the khaki tan.)
Base coat your doughnuts with very pale yellow. Paint one side, set down, let dry...flip and repeat. This is the process for painting classic doughnuts...but you can get creative here by all means. (You'll see in the pic that we did a couple other kinds of doughnuts...a chocolate chocolate...and that other one is pumpkin spice.)
You can continue working upon the waxed paper but we happened to have a cooling rack handy. Let them dry ( you could blow dry them if you'd like to speed things up)
Next step in painting is to make them look "fried". You'll do this with a "fry wash".
Mix a wash using the terra cotta, the golden yellow, and a tiny touch of the chocolate brown. To make the wash just blend the colors on your palette until you get the desired tone and then continually dip your detail brush in water, adding the water to the paint on your palette until you get a semi transparent look to the paint.
Create a "fry line". You'll notice a light toned line that goes right down the middle of a doughnut. We call this the "fry line". It occurs in the cooking process. When they fry doughnuts they float them in hot oil. They fry one side and then flip...the light toned line is the portion that didn't get immersed in the oil, so it remained light. Having this line will give you that realistic doughnut look.
So, the "fry line" should just be the pale yellow from the base coat. Brush the "fry wash" on the top side of your doughnut and blot and dab with a paper towel (which you'll see in the step directly below this.) but when applying this wash and working it with the paper towel don't go all the way down the side of the doughnut...leave this area untouched by the wash...after you wash both top and bottom what remains will be the pale yellow "fry line."
Here's a pic of the wash being wiped and dabbed with a paper towel. Applying the fry wash is a simple process. In fact, the shape and texture of your clay doughnut will almost do the work for you. You're just brushing the wash onto your pale yellow doughnut and then dabbing it away. Again, leave a strip of pale yellow around the middle of the doughnut.
You should see a line. And it's not a problem at all if you get wash on this middle strip of doughnut...because what we always do is wait for the fry wash to dry and then we paint a strip of pale yellow around the middle as you can see in the pic above.
Let them dry ( again you could blow dry them)
Now seal them with a coat of matte finish Mod Podge.
Here comes the FUN part! Dipping them in "glaze"!
We made strawberry, vanilla, chocolate annnd pumpkin spice glazes.
Here is how:
heavy gloss gel medium by Golden
Liquitex gloss varnish
craft paint in desired color
Mixing up your glaze is not an exact science. Mix each in a shallow bowl...this will make it easier for you to dip your doughnut into the glaze.
Ok, the ratio is roughly this...it's mostly the Liquitex gloss varnish.
Then, thicken it up with the Heavy Gel (gloss) medium.
Then add paint until you've got enough color so that your glaze is opaque.
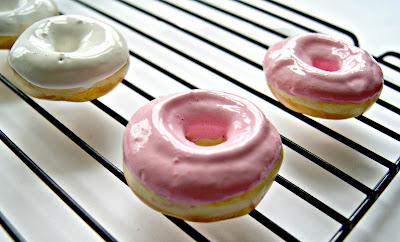
The consistency should be thick enough so that you can dip your doughnut in, then set down your doughnut and the glaze remains on top like a thick frosting. It doesn't just pour down the sides. (see pic below)
As you go along you can add more of the Liquitex if the glaze is too thick, or more gel medium if it's too thin. As you can see in the pic below, the glaze has a ridge line from being dipped, but as the doughnuts sit the glaze will settle.
Don't they look so so fun?
the glaze will settle just like the real thing!
We even made a pumpkin spice doughnut!
We recommend letting them dry for a day or so before displaying them, or "playing" with them.
We hope you enjoyed this tutorial! We think they'd make a really fun family project or rainy day craft with the kiddos! We'd LOVE to see yours! Please, by all means feel free to come back and link up in the comments! And let us know any tricks or tips or changes to the process that helped you along the way. We just love hearing about your own creative endeavors...so please please share all the deets!
Thanks for joining us today!
xo Jenny & Aaron


