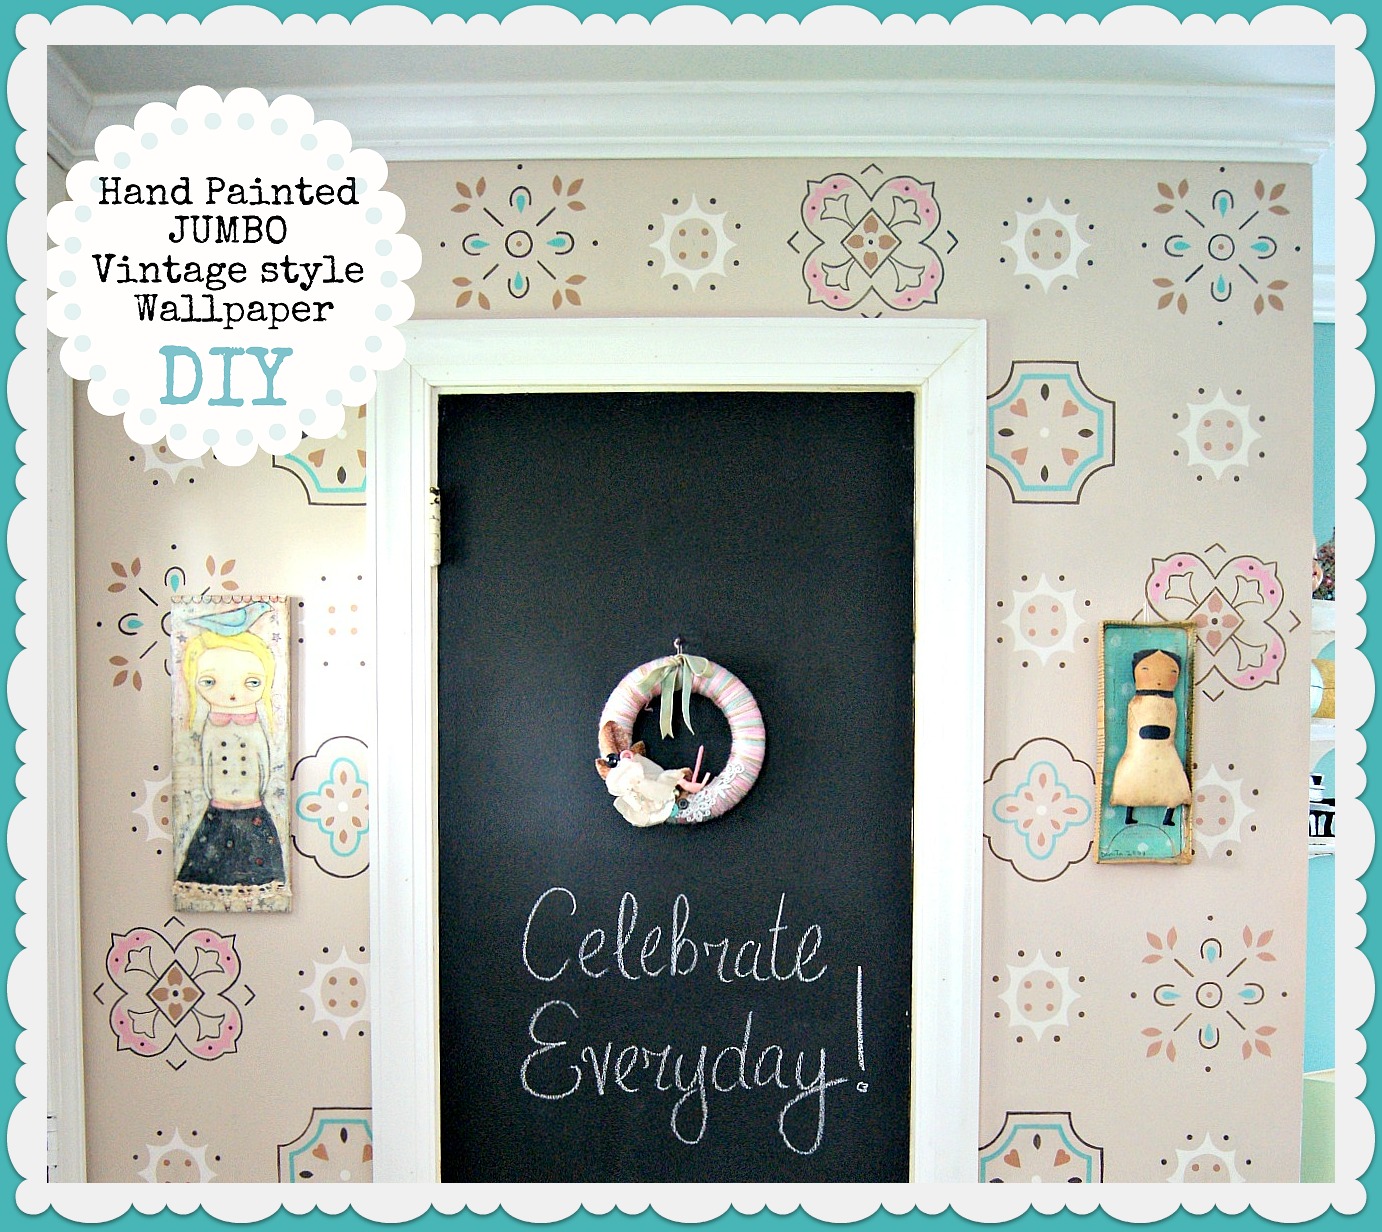


It's amazing what a difference a little change in size makes (ok, a BIG change in size). We love this type of vintage wallpaper, with it's postage stamp size geometric shapes, inked in simple solid colors, the pattern repeated to form more of a texture than an actual graphic.
But if you take that same pattern and enlarge it to comic proportions then it becomes more of a graphic...the colors and shapes become the focus. Taking a typical antique "grandma's house" wallpaper pattern and turning it into a bold modern graphic repeat. From granny chic to mid-century modern.
Because of it's relative simplicity we thought this would be a great decorative painting project to share. We recommend doing it on a small wall because it's bold and graphic and even in a small dose it's a great statement piece. Lots of impact with less labor. We chose the wall with the smallest surface area in our living room and to tie it all together we went with colors that appear in other aspects of our decor.
Because of it's relative simplicity we thought this would be a great decorative painting project to share. We recommend doing it on a small wall because it's bold and graphic and even in a small dose it's a great statement piece. Lots of impact with less labor. We chose the wall with the smallest surface area in our living room and to tie it all together we went with colors that appear in other aspects of our decor.

You can use any similar old wallpaper and enlarge the pattern on a copy machine or printer. We provided here the five designs that make up this particular wallpaper pattern. There are four larger motifs and a smaller "spacer" motifs. Our larger motifs measure about 9 inches across and the small spacer motifs are about 4 and a half inches.
What you will need:
-tracing paper
-pencil
-straight edge ruler
-#4 round artist brush
-acrylic craft paint (we used 5 colors total)
-and household wall paint if you plan on painting a new background color on your wall like we did
First print out the designs in their respective sizes. The four larger designs measure approx. 9 inches and the spacer design measures approx. 4 and a half inches.
Place a piece of tracing paper on top of each design and trace the design with pencil. You will then use these separate pieces of tracing paper to transfer each each individual motif onto the wall. It's a simple method...all you do is flip the piece of tracing paper over so that the side with the pencil drawn on it is pressed against the wall and then re-draw the lines on the backside so that the pencil lines transfer onto the wall. You can then continue to flip and re-flip the piece of tracing paper as you continue along the wall.

We always start a pattern from the top left corner. So take your first traced design, position it in the upper left corner of the wall and transfer the tracing onto the wall. The center of our first motif is 5 inches from the ceiling, so the center of each motif in the top row will also be 5 inches from the ceiling.
Then you create a symmetrical pattern by making sure the center points of each motif are equidistant apart, both horizontally and vertically. Place the smaller spacer motif between each larger motif, and with your ruler measure approx. 9 inches between each motif's center.
So the top row will go in this order:
motif # 1 - spacer - motif # 2 - spacer - motif # 1 - spacer - motif #2 - spacer - etc.
the 2nd row will go in this order:
spacer - motif # 3 - spacer - motif # 4 - spacer - motif # 3 - spacer - motif # 4 - etc.
the 3rd row will go in this order:
motif # 2 - spacer - motif # 1 - spacer - motif # 2 - spacer - motif # 1 - spacer - etc.
So if you stand back and look at the pattern each larger motif will have a spacer on both sides and directly over and under it. And motif 1 & 2 will share a row while motif 3 & 4 share a row, rotating back and forth. Refer to the illustration above for an example.
print out the motifs according to these sizes:
The larger motifs measure 9 inches.
The spacer motif measures approx. 4 and half inches.
1.

2.

3.

4.

Spacer

So now that the entire pattern is traced onto your wall it's time to fill it in with paint colors using your #4 round artist brush. We first painted our wall tan and used just a few subtle colors that went well with the tans and vintage pastels around the rest of the room. It's best to keep your color palette simple...maybe use four or five colors total.
Our colors are:
-dark brown
-antique white
-tan
-pink
-aqua
You can substitute these to suit your decor. Just make sure to repeat the color pattern over and over, filling in the same parts of each motif with their respective colors. If you're not very experienced with a detail paintbrush it might be a good idea to paint in a practice version of each motif on paper. You can also use this as your color reference sheet...so you know at all times which paint color fills in which area.
We'd love to see you give this a try. Again, even if it's done on a tiny wall it still makes a big impact in the room. Contact us with any further questions, we'd love to help in any way! Happy designing, happy painting!
xo Jenny ...and Aaron!


